


Description
What our More Area and Perimeter lesson plan includes
Lesson Objectives and Overview: More Area and Perimeter presents how to use formulas for area and perimeter of a rectangle and square to find the area and perimeter of L-shaped and other similar figures. At the end of the lesson, students will be able to use formulas for area and perimeter of a rectangle and square to find the area and perimeter of L-shaped and other similar figures. This lesson is for students in 4th grade, 5th grade, and 6th grade.
Classroom Procedure
Every lesson plan provides you with a classroom procedure page that outlines a step-by-step guide to follow. You do not have to follow the guide exactly. The guide helps you organize the lesson and details when to hand out worksheets. It also lists information in the blue box that you might find useful. You will find the lesson objectives, state standards, and number of class sessions the lesson should take to complete in this area. In addition, it describes the supplies you will need as well as what and how you need to prepare beforehand. The supplies you will need for this lesson are rulers, scissors, tape, and handouts. To prepare for this lesson ahead of time, you can gather the supplies and copy the handouts.
Options for Lesson
Included with this lesson is an “Options for Lesson” section that lists a number of suggestions for activities to add to the lesson or substitutions for the ones already in the lesson. An optional adjustment to the lesson activity is to change the number of figures that students need to create. They can also use pieces of cardboard for the activity instead, and use centimeters instead of inches. Finally, you can find odd-shaped rooms or spaces in your classroom or school and have students find the area.
Teacher Notes
The teacher notes page includes a paragraph with additional guidelines and things to think about as you begin to plan your lesson. It notes that this lesson is an extension of previous Area and Perimeter lessons and that the additional resources for this lesson are similar. This page also includes lines that you can use to add your own notes as you’re preparing for this lesson.
MORE AREA AND PERIMETER LESSON PLAN CONTENT PAGES
More Area and Perimeter
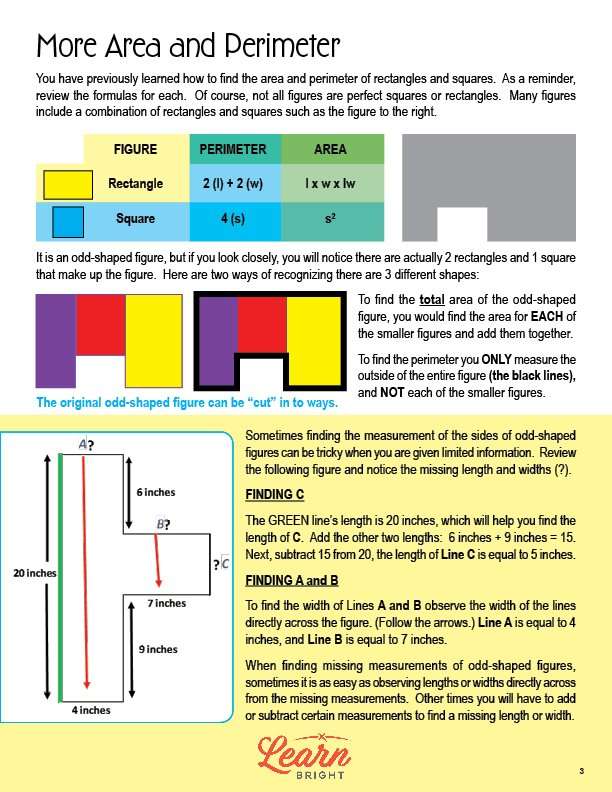
The More Area and Perimeter lesson plan includes two pages of content. The lesson begins by reminding students that they’ve already learned how to find the area and perimeter of both rectangles and squares. The worksheet lists each of these formulas for them to review as needed. Several figures are made up of a combination of different rectangles and squares.
In order to find the total area of an odd-shaped figure, you just need to find the area of each smaller figure and add them together. To find the total perimeter, you measure the outside of the entire figure, instead of each smaller figure.
It can be hard to find measurements of the sides of odd-shaped figures, especially without all the necessary information. The lesson includes an example that shows what you can do in a situation like this. You can use the information from one side of the figure to determine the length of other sides. You can look at the example in the lesson for a more detailed walkthrough. Sometimes you can find a missing measurement for an odd-shaped figure by observing the lengths or widths of the side directly across from it. In other cases, you may need to either add or subtract various measurements to find the missing length or width.
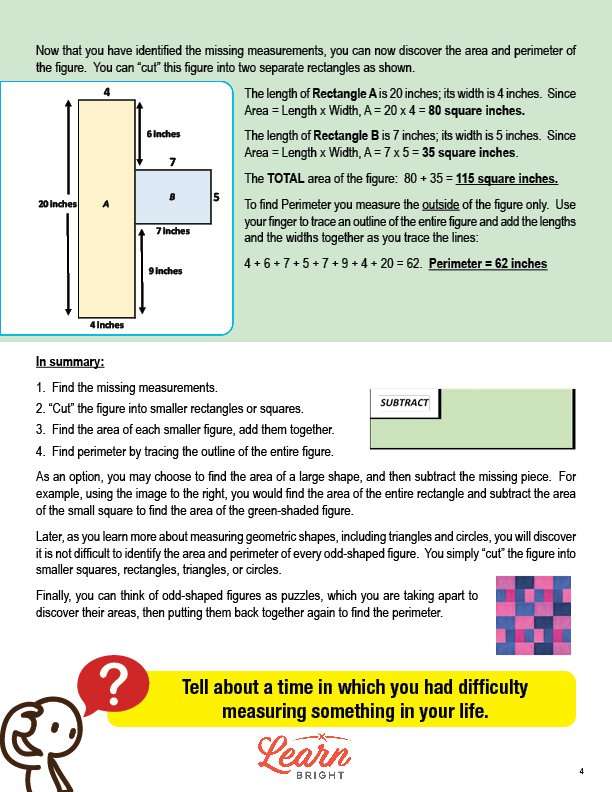
Once you have all of the measurements for a figure, you can use that information to find the area and perimeter of that figure. The best way to do this is to cut the figure up into smaller rectangles. The lesson shows an example of this.
In Summary
To summarize, you should first find any missing measurements. Next, you should cut the figure into small rectangles and squares. You should then find the area of each smaller figure and add them together to find the total area. Finally, you should find the perimeter of the figure by tracing the outline of the entire figure. Another method is to find the area of a large shape and subtract the missing piece. The lesson shows an example of how to do this.
In future lessons, students will learn how to find the area and perimeter of other odd-shaped geometric shapes. For all of these shapes, all they need to do is cut the figure up into smaller squares, rectangles, triangles, or circles, and add them together. It can be helpful for them to think of these shapes as puzzles that they can take apart and put back together.
MORE AREA AND PERIMETER LESSON PLAN WORKSHEETS
The More Area and Perimeter lesson plan includes three worksheets: an activity worksheet, a practice worksheet, and a homework assignment. You can refer to the guide on the classroom procedure page to determine when to hand out each worksheet.
CUT OUT SHAPES ACTIVITY WORKSHEET
For this activity worksheet, students will cut out the provided rectangles and squares. They will then combine two or more of them to create ten different figures by taping the rectangles and squares together. They’ll use each shape only one time. They will then exchange their ten shapes with another student. Next, they will measure and find the area and perimeter of the shapes given to them by the other student, making a small sketch of each shape and recording their answers in the provided chart. Finally, they will give the shapes and measurements back to the original student, who will check their answers.
Students can work in pairs if you’d prefer.
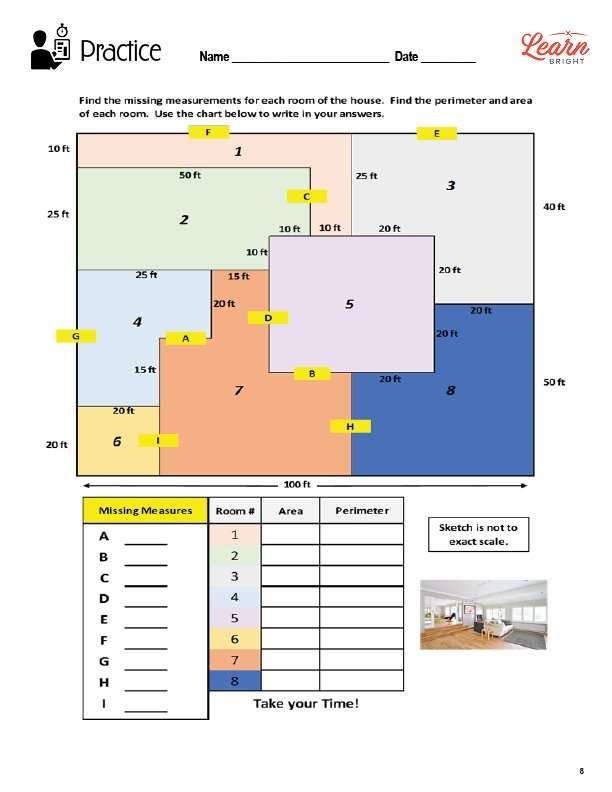
MISSING MEASUREMENTS PRACTICE WORKSHEET
For the practice worksheet, students will find the missing measurements for each room of the house shown on the worksheet. They will find the area and perimeter of each room, and will record their answers in the chart provided on the worksheet.
MORE AREA AND PERIMETER HOMEWORK ASSIGNMENT
The homework assignment asks students to find the area and perimeter of each figure using the provided measurements.
Worksheet Answer Keys
This lesson plan includes answer keys for the practice worksheet and the homework assignment. If you choose to administer the lesson pages to your students via PDF, you will need to save a new file that omits these pages. Otherwise, you can simply print out the applicable pages and keep these as reference for yourself when grading assignments.


