

Description
What our Comparing Fractions lesson plan includes
Lesson Objectives and Overview: Comparing Fractions reviews important vocabulary and terms and teaches students to compare fractions using multiple approaches. At the end of the lesson, students will be able to compare fractions. This lesson is for students in 3rd grade, 4th grade, and 5th grade.
Classroom Procedure
Every lesson plan provides you with a classroom procedure page that outlines a step-by-step guide to follow. You do not have to follow the guide exactly. The guide helps you organize the lesson and details when to hand out worksheets. It also lists information in the blue box that you might find useful. You will find the lesson objectives, state standards, and number of class sessions the lesson should take to complete in this area. In addition, it describes the supplies you will need as well as what and how you need to prepare beforehand. The only supplies you need are a deck of cards.
Options for Lesson
Included with this lesson is an “Options for Lesson” section that lists a number of suggestions for activities to add to the lesson or substitutions for the ones already in the lesson. One optional addition to this lesson is to write fractions on the board and have your students practice converting them to another denominator as fast as they can. You can also use improper fractions and mixed numbers to increase the difficulty levels for students. Finally, you could have your students use chalk outside to create area maps.
Teacher Notes
The teacher notes page includes lines that you can use to add your own notes as you’re preparing for this lesson.
COMPARING FRACTIONS LESSON PLAN CONTENT PAGES
Comparing Fractions Vocabulary
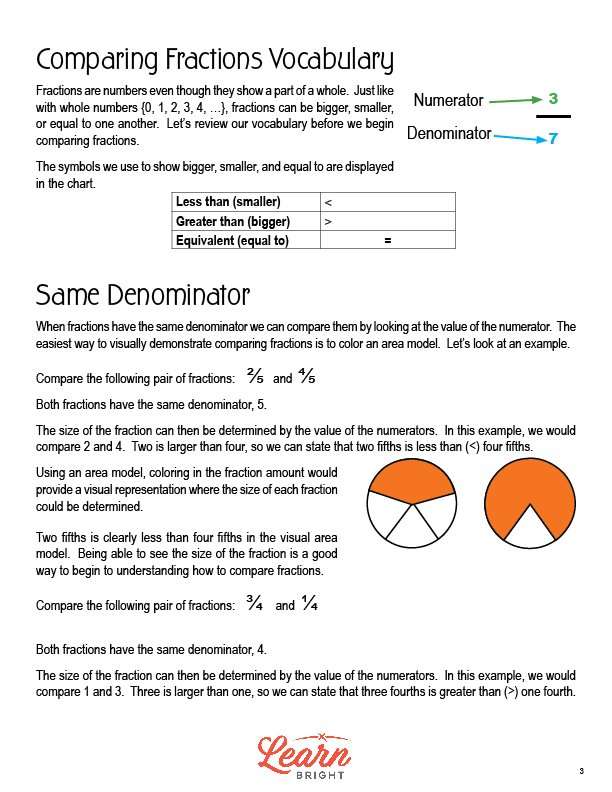
The Comparing Fractions lesson plan includes two pages of content. Fractions are numbers which show part of a whole. Like whole numbers, fractions can be larger, smaller, or equal to one another. Before we start comparing fractions, it’s important to understand the vocabulary and symbols.
We use symbols to show which fractions are bigger, smaller, or equal. We use < to represent less than (smaller), > to represent greater than (bigger), and = to represent equivalent (equal to).
Same Denominator
If fractions have the same denominator, we can compare them simply by looking at the numerator. The easiest way to represent this visually is by coloring an area model. They lesson includes an example problem, comparing the fractions 2/5 and 4/5. Both have the same denominator, 5. We can find the size of the fraction by looking at the numerator. In this example, we’re comparing 2 and 4 as the numerators. 2 is smaller than 4, so 2/5 is less than (<) 4/5.
We can show this with an area model where we color in the fraction amount. When we do so, we can clearly see than 2/5 is less than 4/5. Being able to look at a visual representation of the fractions helps us understand and compare fractions.
For another example, we can compare 3/4 and 1/4. Both have the same denominator, 4, so we look at the value of the numerator. Here, we’re comparing 3 and 1. 3 is larger than 1, so 3/4 is greater than (>) 1/4. We can also use an area model to compare the fractions.
Different Denominator
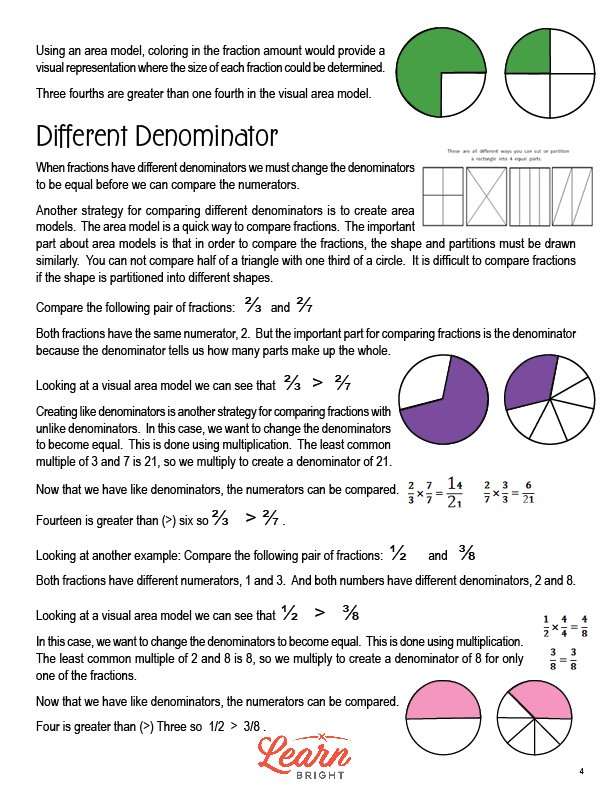
If two fractions have different denominators, we have to change the denominators and make them equal before we can compare them. We can also compare them using area models. This is a fast way to compare. One thing to note about using area models is that the two models have to be similar. For example, you can’t compare half of a triangle with a quarter of a circle. You would want to use two triangles or two circles instead.
The lesson includes a few examples. First, it’s comparing 2/3 and 2/7. They have the same numerator, 2, but different denominators, 3 and 7. If we use a visual area model, we can clearly see that 2/3 > 2/7. However, we can also compare them by making the denominators the same. We can do this using multiplication. The least common multiple of 3 and 7 is 21, so we multiply the fractions to create like denominators of 21: 2/3 x 7/7 = 14/21 and 2/7 x 3/3 = 6/21. Now that we have like denominators, we can compare the numerators. 14 is greater than 6, so 2/3 > 2/7.
The lesson closes with another example problem that we solve in the same way: 1/2 and 3/8. The visual area model shows us that 1/2 > 3/8. Using like denominators, we get the same answer. The least common multiple of 2 and 8 is 8, so we only need to multiply one fraction to get a common denominator. 1/2 x 4/4 = 4/8. We compare numerators, 4 and 3, and find that 1/2 > 3/8.
COMPARING FRACTIONS LESSON PLAN WORKSHEETS
The Comparing Fractions lesson plan includes three worksheets: an activity worksheet, a practice worksheet, a homework assignment, and a quiz. You can refer to the guide on the classroom procedure page to determine when to hand out each worksheet.
DECK OF CARDS ACTIVITY WORKSHEET
For the activity worksheet, students will draw two cards from a deck, placing one in the numerator and one in the denominator. They will compare the fractions, with the larger fraction winning. The player with the most cards at the end wins!
AREA MODELS PRACTICE WORKSHEET
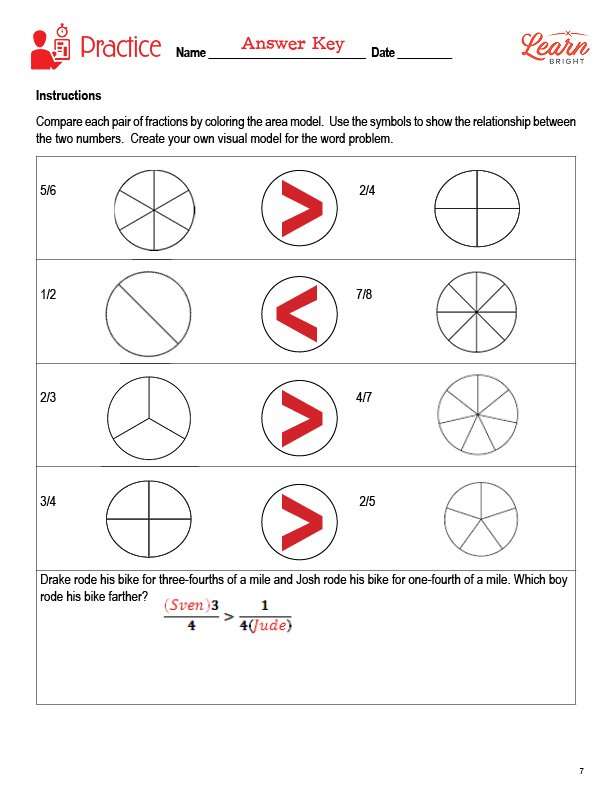
The practice worksheet asks students to compare pairs of fractions by coloring in an area model. They will use symbols to show the relationship between the numbers. They will also create their own visual model for the word problem, which they will solve.
COMPARING FRACTIONS HOMEWORK ASSIGNMENT
For the homework assignment, students will compare pairs of fractions by either drawing a visual area model or creating equivalent denominators. They will use symbols to show the relationship between the numbers. They will also solve a word problem.
QUIZ
This lesson also includes a quiz that you can use to test students’ understanding of the lesson material. For the quiz, students will compare two pairs of fractions, drawing a visual area model and creating equivalent denominators for each. They will use symbols to show the relationship between the numbers. They will also solve a word problem.
Worksheet Answer Keys
This lesson plan includes answer keys for the practice worksheet, the homework assignment, and the quiz. If you choose to administer the lesson pages to your students via PDF, you will need to save a new file that omits these pages. Otherwise, you can simply print out the applicable pages and keep these as reference for yourself when grading assignments.


