


Description
What our Angle Measurement lesson plan includes
Lesson Objectives and Overview: Angle Measurement teaches students how to measure angles with a protractor and how to draw angles with a certain degree measurement. They will complete several worksheets and a homework assignment in order to test their understanding of the lesson material. This lesson is for students in 4th grade.
Classroom Procedure
Every lesson plan provides you with a classroom procedure page that outlines a step-by-step guide to follow. You do not have to follow the guide exactly. The guide helps you organize the lesson and details when to hand out worksheets. It also lists information in the blue box that you might find useful. You will find the lesson objectives, state standards, and number of class sessions the lesson should take to complete in this area. In addition, it describes the supplies you will need as well as what and how you need to prepare beforehand. The supplies you will need for this lesson are the handouts, protractors, rulers, and crayons or markers. To prepare for this lesson ahead of time, you can gather the supplies and copy the handouts.
Options for Lesson
Included with this lesson is an “Options for Lesson” section that lists a number of suggestions for activities to add to the lesson or substitutions for the ones already in the lesson. One suggested addition to this lesson is to have your students measure various objects in your classroom, sketch them, and write down their angle measurements. Another addition could be to have students measure the angles on laminated cards or different images using dry erase markers and a protractor. Note that in order to add this activity, you would also have to create or source the laminated cards.
Teacher Notes
The teacher notes page includes a paragraph with additional guidelines and things to think about as you begin to plan your lesson. It notes that, though this is a math lesson, students get to use their art skills to draw angled stick figures using a protractor. This page also includes lines that you can use to add your own notes as you’re preparing for this lesson.
ANGLE MEASUREMENT LESSON PLAN CONTENT PAGES
Angle Measurement Measuring with a Protractor
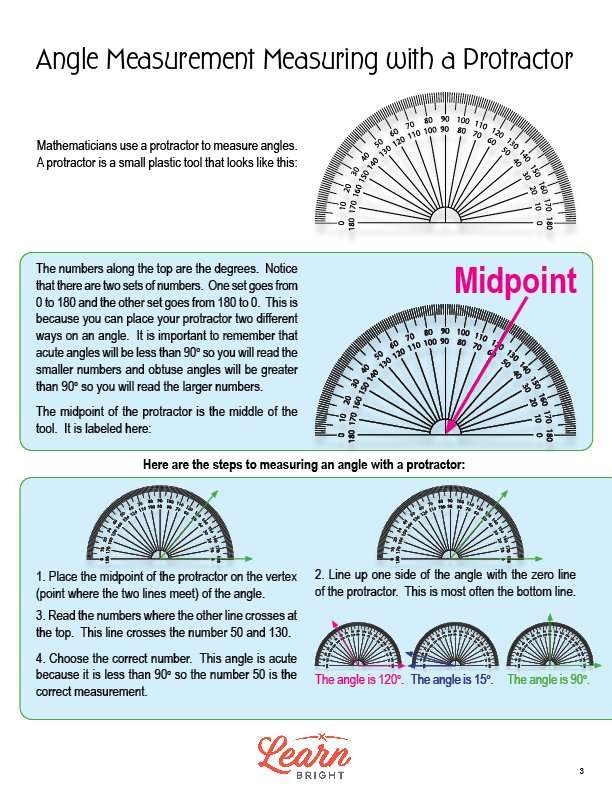
The Angle Measurement lesson plan includes two content pages. The lesson begins by stating that mathematicians use a tool called a protractor to measure angles. The lesson includes a picture of a protractor so that students can familiarize themselves with the tool. It then explains that the numbers around the top edge of the tool represent degrees. There are two sets of numbers on a protractor, with one set going from 0 to 180 and the other from 180 to 0. This allows you to place a protractor two different ways on an angle.
Students will learn that acute angles are less than 90°, so they would read the smaller numbers, and that obtuse angles are greater than 90°, so they would read the larger numbers. Protractors also have midpoints, found in the middle. The lesson marks that point on a picture of a protractor.
Next, the lesson lists the four steps to measuring an angle using a protractor, including diagrams to illustrate. The first step is to place the midpoint of the protractor on the vertex, or the point where the two lines meet, of an angle. Next, you line up one of the sides of the angle with the zero line of the protractor (often found on the bottom line). Then, you find the numbers where the second line crosses at the top, which will cross between the number 50 and 130. Finally, you identify the right number! In the lesson example, the number is less than 90° and therefore acute. This means that, in this case, the number 50 is the correct measurement for the angle.
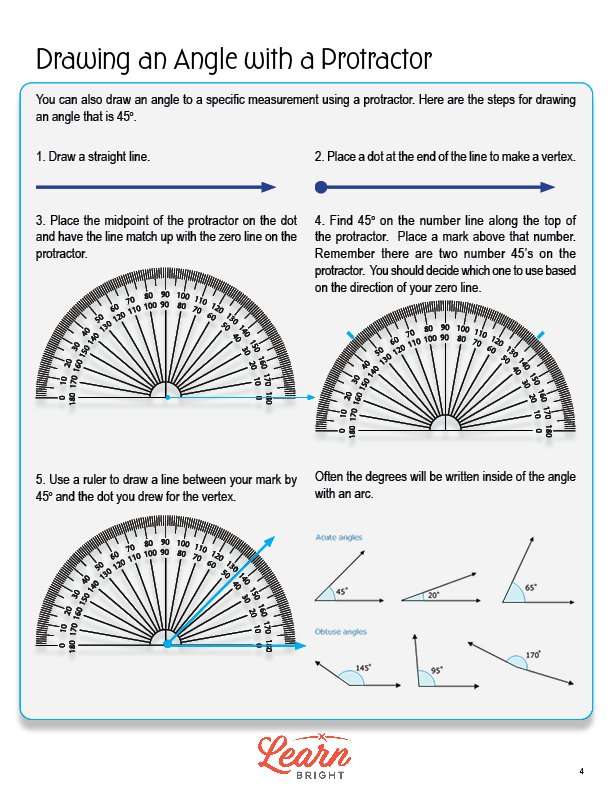
Drawing an Angle with a Protractor
The next part of the lesson teaches students how to draw a specific angle using a protractor. The lesson uses drawing a 45° angle as an example. The first step in this process is to draw a straight line. Next, you draw a dot at one end of the line, creating a vertex. Then, place the midpoint of the protractor on that dot and make sure the zero line on the protractor lines up with the straight line you drew. Next, find the angle you are measuring (in this case, 45°) and mark that number. Make sure to choose the right 45 based on the direction of your zero line, as there are two of each number on every protractor. Finally, you can use a ruler to draw a line between the mark you made by the number and the dot on the vertex. You can also label your angle by writing the degree inside the angle with an arc.
ANGLE MEASUREMENT LESSON PLAN WORKSHEETS
The Angle Measurement lesson plan includes three worksheets: an activity worksheet, a practice worksheet, and a homework assignment. You can refer to the guide on the classroom procedure page to determine when to hand out each worksheet.
STICK FIGURES ACTIVITY WORKSHEET
For the activity worksheet, students will draw two stick figures. They will use the listed angle measurements for the arms, legs, and bodies of their stick figures. Next, they must label the angles on their stick figures. They have to use 90° angles, 45° angles, 160° angles, and 30° angles.
ANGLE MEASUREMENT PRACTICE WORKSHEET
The practice worksheet asks students to use a protractor to measure nine different angles and write them down. They must then sketch two angle measurements using a protractor. This will test their understanding of the lesson material.
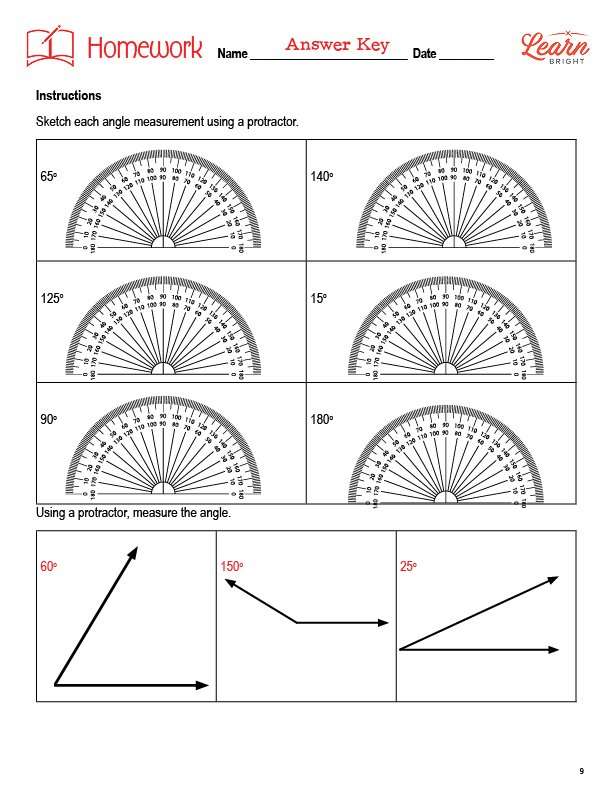
ANGLE SKETCHING HOMEWORK ASSIGNMENT
Students will sketch six different angles for the first part of the homework assignment. They will also use a protractor to measure three different angles. This reinforces the knowledge that they learned during class at home.
Worksheet Answer Keys
This lesson plan includes answer keys for the practice worksheet and the homework assignment. The lesson plan does not include an answer key for the activity worksheet. If you choose to administer the lesson pages to your students via PDF, you will need to save a new file that omits these pages. Otherwise, you can simply print out the applicable pages and keep these as reference for yourself when grading assignments.


